Friday, June 25, 2010

In Conclusion...

Well friends, our time together this week is almost done. It has been an honor and a pleasure working with you all and I am extremely impressed by what you've accomplished in just a few short (or long, depending on your perspective) days.

But that doesn't mean goodbye.

I am excited to hear/see how you use your new skills and abilities in your own programs. I would very much like to visit your sites and continue working with you, helping in whatever capacity I can to assist in launching or expanding your program. You have my contact info and I will be checking in with you before the start of the next school year. In the meantime, I wish you all a great summer!

-Chris

BUT BEFORE YOU GO:
Please take the time to fill out the following Post Survey to help us evaluate this training and improve upon it in the future:


Final Projects!

For your Final Project in this class, you are going to compose a full song. You can use either Reason or Garageband. Then, towards the end of the day, you will be presenting your song to the class.

When you come up to present, please be prepared to say a bit about your project. Some suggestions:
  • Which software program you used
  • What kinds of instruments you used and why
  • What was your process for putting the song together
  • Was there a certain sound you were going for? Did you achieve it?
  • What do you like best about your project? What would you change if you had more time?

Please include all the following elements in your project:
  • 2 Verses
  • 2 Choruses
  • a short Intro
  • a Fade Out
  • at least 6 different instruments

Projects are due at 3:30 pm!

Fade Outs

One easy and effective way to end a song is to “fade it out”. This just means having the music gradually get quieter and quieter, like the song is fading off into the distance.

In Reason, we can create Fade Outs by making the Master volume fader on the mixer automatically come down at the end of the song.

The Master fader controls the volume of all the tracks, so we can use it to make all the instruments fade out at the same time.

Please do the following:
1. Open one of your songs.
2. Make sure your Mixer has a track in the Sequencer. (If it doesn't, right click on the Mixer in the Rack and click on Create Track)
3. Click on the Mixer track to highlight it.
4. Find the end of your song in the Sequencer.
5. Decide which bars you want your fade out to start and end on.
6. Click on the Automation button and select Master Level.
7. Click on the Switch Mode button to switch to Edit Mode in the Sequencer.
8. Scroll until you find the Bar where you want to start your fade out.
9. Click on the Pencil Tool.
10. Click and drag a box from the start to the end of where you want the fade to happen.
11. Click once on the start point.
12. Click once on the end point.
13. Now click on the Selection Tool.
14. Click on the end point of the fade and drag it down to the bottom of the track.
15. Play the end back and make sure it sounds right.
16. Make any necessary adjustments.

(Instructor: Advanced students can go back to previous songs (e.g. FullSong1, FullSong2, etc.) and create fade outs.)

Resources:
1. www.looknohands.com - scale finder
2. www.youtube.com - online videos
3. www.grooveshark.com - music library

Thursday, June 24, 2010

Song Structure (pt. 3)_Intro


Materials:
• Student files from Week 11 (“FullSong1”)
• Computer with internet connection and speakers
• Song example featuring an Intro
(Suggestion: “Empire State of Mind” by Jay Z and Alicia Keys)

Discussion:
In the last few lessons we worked on creating Verse and Chorus sections for our beats.

Recap:
• What is a Verse and how long is it usually in modern pop music?
• What is a Chorus and how long is it usually?

New question – how many Verses and Choruses do you usually have in a song?

To help us get some ideas about this, everyone is going to listen to a whole song all the way though and count the number of Verses and Choruses. Two other things to listen for:
• How does the song start?
• Are there any other parts that are different than the Verse and Chorus?

(Instructor: As a class, listen to beginning of a song and identify Chorus. Then, have students listen to the entire song individually on headphones, or as a class, and count Verses/Choruses. After listening, have a group discussion to see how many they were able to count. Play back Intro section and have students break it down – instruments, feeling, etc. Song suggestion: “Empire State of Mind” by Jay-Z and Alicia Keys.)

So, as we just heard, there is another part of a song that is very important to the way a song hits the listener…

The Intro
1. Is the opening to the song.
2. Purpose is to build suspense and anticipation for the song to really get going (the first Verse or Chorus)
3. A common technique for making an Intro is to start with just the drums, or just the melody. This makes the listener wait for the missing parts and makes it more exciting when the other instruments come in.
4. Is often 4-8 bars long.

So now you are going to do a few things with your beat:
1. Copy the Verse and Chorus so that you have enough parts for a full song
2. Add an Intro section
3. (If you have time) change something in the 2nd and 3rd Verse to make the whole song more interesting.
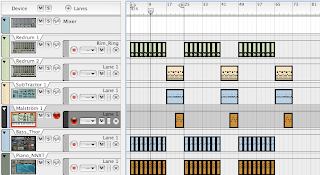
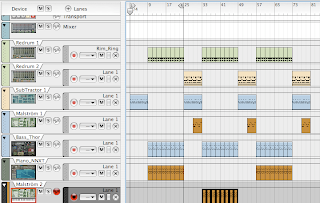
Please do the following:

Part 1
First, let’s turn our “beats” into a “SONGS” by copying the Verse and Chorus 2 times…
1. Zoom out (press G on keyboard) so that you can see your whole beat in the Sequencer.
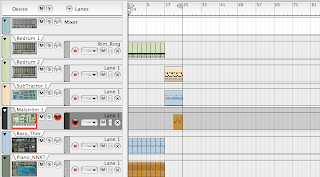
2. In the Sequencer, find an empty spot above and to the right of your Chorus section. Click and drag the mouse downwards and to the left so that you see a box around the Verse and Chorus sections. Let go of the mouse button.
3. Everything should now be highlighted. Hold down the OPTION/ALT key on your keyboard. Click anywhere in the beat and drag it to the right. Line the copy up so that the Verse starts on Bar 25 and let go of the mouse button.
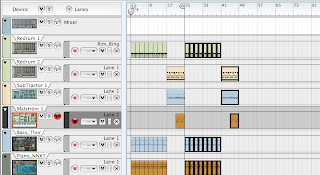
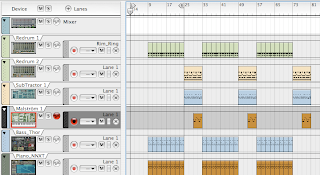
4. The Verse and Chorus copy should still be highlighted. Hold down OPTION/ALT and click and drag another copy to start on Bar 49.
5. The beat should now end on Bar 73. Congratulations, you just made a whole song!!!
6. Save the song as: your name_FullSong1
7. Have the instructor listen to your song.
8. Save again!!!

(Instructor: For advanced students who finish early, encourage them to revisit one of their earlier beats and build into a Verse/Chorus structure.)
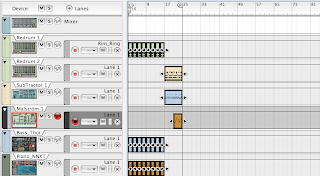
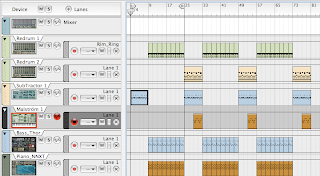
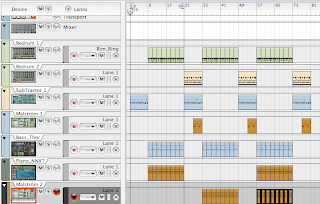
Part 2
Now we will make an Intro to the song.
1. First we need to grab and highlight everything. Remember how to do this? Just click and drag a box around everything…
2. With everything highlighted, click inside one of the regions and drag everything to the right. Make it so that everything starts on Bar 9. Be careful not to drag on the little arrows at the ends of the regions!
3. Click in a blank part of the Sequencer to unhighlight everything.
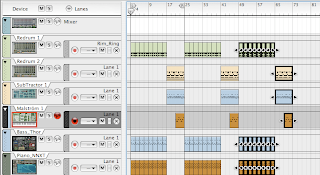
4. Now pick one of the instruments that you want to use for the Intro. Hold down ALT/OPTION on your keyboard and click and drag the region to the beginning of the song.
5. Play it back and listen to it. Is it good? Would a different instrument be better in this part? Would it help to add a new instrument? What can you do to make this a good start to your song?
6. SAVE.
7. Have the instructor listen and give you feedback.

(Instructor: Encourage students to put effort into making their Intros exciting. Suggestions include adding a few extra drum sounds (e.g cymbals), or adding an extra instrument at the end of the Intro right before the first Verse starts.)

Part 3 (time permitting)
Because we don’t have a singer or MC on our songs right now, the Verses might sound a little repetitive. We can help change this by switching the instruments up in each Verse. Here’s a quick and easy way to do it…
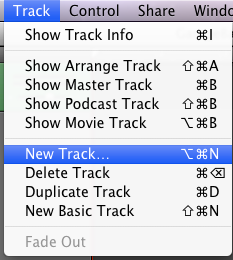
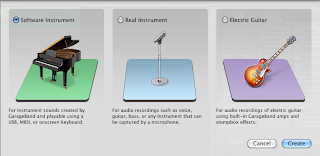
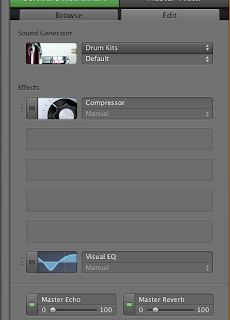
1. Create a new melodic instrument (NN19, Subtractor, Malstrom, etc.).
2. Now highlight the 2nd Verse of one of the other instruments.
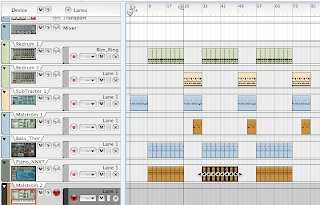
3. Drag it onto the track of the new instrument.
4. While the regions are still highlighted, hold down ALT/OPTION and drag a copy of the regions over to Verse 3.
5. Play Verse 2 and listen to the sound of the new instrument.
6. If you want to change it, click on the Browse Patch button and load another sound.
7. Now check Verse 3 to see if it sounds good with both instruments playing. If it doesn’t sound good, what can you change?
8. SAVE.
9. Have the instructor listen to your work.


(Instructor: Make sure student work is saved and backed up for use in Week 12 Lesson 2. Advanced students can be allowed to work ahead on next lesson.)

Resources:
1. www.looknohands.com - scale finder
2. www.youtube.com - online videos
3. www.grooveshark.com - music library

Day 5 Goals

Almost done! The last day of class is already upon us and I hope you've been getting what you need out of the class. Today we have just a few more things we need to cover and then you will all be working on a Final Project which you will present to the class.

Quickly, here's the plan for the day:
  • Talk about the history of the music production tools we've been using in this class
  • A quick discussion of the categories of sounds found in synthesizers
  • Cover two more elements of Song Structure - Intros and Outros (Fade Outs)
  • Assign and work on Final Projects
  • Present Final Projects (3:30 pm)
  • Cover Exporting Audio files
  • Questions and one-on-one instruction

OK folks, let us do it.

Garageband vs. Reason


1)bring funkydrumer breakbeat to desktop from class materials in yellow share folder


2)import drum break by dragging and dropping audio inside garageband


3)double click on audio file


4)zoom in until you can see blank audio area


5)take off snap to grid option


6)split as much of blank audio as possible


7)delete area with blank audio


8) Move remaining audio piece( the part that will be sampled) to beginning of the track

(0:00 sec/ beginning of Bar 1)


9)Make the tempo visible if not already by going to control and choosing to see tempo in LCD


10)Funky Drummer Loop is only one bar so make sure the end of the loop stops at the end of bar 1

aka the beginning of bar 2.


11)Place arrow marker on the beginning of bar 2 highlight audio sample and cut excess audio.


12) Open up loop browser


13) drop funky drummer loop in loop browser


14) Click in instrument description all drums ----> Beats and any mood


15) add sound to favorites


Several of you have asked about the relative pros and cons of Garageband versus Reason. Briefly, here are some considerations:

Garageband
Pros
  • *FREE* with Macintosh computers
  • Can record audio & Import Audio/Movies
  • Includes a Musical Typing keyboard which lets you play notes with your regular computer keyboard
  • Use Plugins- Audio Units(AU'S) & Sound-fonts
  • When used as sampler can manipulate pitch and tempo separately
Cons
  • Not available for PCs
  • Need to program drums live if not using additional drum programming software

Reason
Pros
  • Available for Mac and PC
  • Extensive sound selection
  • Built-In Drum Programmer
Cons
  • Requires purchase of a keyboard to really be usable
  • Can not import audio directly (Not a true D.A.W)

How to Record Drums

1)Create a new track by selecting the "new track" option in the menu


2) Choose Software track


3) On the right side where the instrument menu is, click the edit section


4)The default instrument option is piano change it to drum kits and select the hip hop drum kit


5)Turn on the count-in button and change the LCD option to tempo and change tempo as necessary


6) Make sure your Hip Hop Drum Kit is highlighted in the main track area and press record when ready.


Garageband extras
Additoinal Instruments (Free)
-http://co.native-instruments.com/index.php?id=koreplayerdlmac
-http://mac.softpedia.com/get/Audio/Boldt-24-Pack.shtml
http://download.cnet.com/Boldt-24-Pack-Volume-II/3000-2170_4-10861179.html
-http://mac.softpedia.com/get/Audio/Boldt-24-Pack-Volume-III.shtml
-http://www.hammersound.net/cgi-bin/soundlink.pl

Drum Programmer ($59)

-http://www.izotope.com/products/audio/idrum/


Assignment

1)Create Song 16 Bar verse 8 Bar Chorus
2) Record Answers to questions sent via email on microphone
3)Use at least 3 different melodic instruments and record original drum pattern.
4) Save as yourname_GaragebandAssignment


Day 4 Goals

Today we are going to switch gears a bit and work with a different program which many of you are already familiar with - Garageband. Hopefully, now that we all have some experience creating music with Reason, we will be able to see how the two programs work in very similar ways and that the knowledge you've acquired can translate across platforms. Today's lessons will be taught by Quinn Gibson, our resident Garageband Wizard.

Goals
  1. Introduction to the Garageband interface, tools and workflow
  2. Using the Software Instruments
  3. Basic audio editing and recording

Wednesday, June 23, 2010

Song Structure (pt. 1)_Verse & Chorus


Materials:

• Computer with internet connection and speakers
• Song examples

Discussion:
Now that we know our way around the keyboard and most of the instruments in Reason, let’s take a little time to really learn about how songs are put together...

There are lots of different ways you can structure music and different types of music tend to have their own rules about it. Generally speaking, in most types of popular music, you have two or more parts that trade off, and repeat throughout the song. Why do you think this happens?

Here are a couple reasons:
1. Repetition - people tend to like it when they hear a part of a song that they have heard before. Since they remember it and know how it's going to go, that helps them to sing along, dance, and experience the music.
2. Variety - If you just repeat the same part over and over again, it gets boring pretty fast! But if you switch it up a little by having a couple of different parts trading off, you can keep things fresh and interesting for the listener.
Today, we're going to look at two particular parts: the Verse and the Chorus.

The Verse
• is the part of the song where the story is told.
• The lyrics usually change from verse to verse, but the instrumental (rhythm and melody) generally stays the same.
• There are often fewer instruments and the music is quieter in this section. This helps the listener concentrate on the lyrics and hear what the singer/MC is saying. This can also help the Chorus seem more exciting when it hits.
• Verses tend to be longer; in a typical hip hop song, verses are 16 bars long.

The Chorus (aka "The Hook")
• Is the part where the same lyrics and music are repeated throughout the song.
• Is usually the most exciting part, where the energy (and volume!) are the highest.
• Is the part that people are most able to sing along with; it usually has fairly simple, easy to remember lyrics.
• Usually has more instruments than in the Verse.
• Is usually shorter than the verse; in a typical hip hop song, the Chorus is 8 bars long.
So let's take a quick minute to practice our listening skills. See if you can pick out the Verses and Choruses in the following songs. Also, try to listen for the changes in the lyrics and the different types of instruments in each section. Count the number of bars in each section.

(Instructor: play several examples of music illustrating Verse/Chorus. Showing a video and/or providing lyrics can be helpful for following along. Suggestions:
- “Get Up, Stand Up” by Bob Marley
- “Me Against the World” by Tupac Shakur
- “Billie Jean” by Michael Jackson)

In each song, what was different between the Verse and the Chorus? What about the actual instruments? Which part came first, the verse or the chorus?

For today's assignment you will focus on developing a solid Verse section for a song. You’ll also learn a technique that will allow you to quickly copy parts of your beat to make it longer. If you finish early, you can move on to the next lesson, where you will be work on the Chorus.

Please do the following:
1. Open Reason
2. Create a Redrum.
3. Make a 2-bar (32-step) beat and put it into the Sequencer using Copy to Track.
4. Adjust the Tempo if necessary.
5. Create at least 2 other instruments (NN19, Subtractor, NNXT, etc.) and write some melodic and or/rhythmic parts to go over the drums. No more than 1 Dr. REX please!
6. Record these parts into the Sequencer.

Tips, tips, tips!
Here are some ideas if you’re not sure what kind of melody to write…
1. You don’t need a lot of notes to make a good melody! First, just pick one note to start with and practice playing it in time with the drums. Now find a 2nd note that sounds good after the first one. Try going back and forth between them. Now add a 3rd, 4th, etc.
2. Try finding an instrument that sounds really with the drums. If you want an electronic sound, use a Subtractor or Malstrom. If you want a realistic sound, use an NN19 or NNXT. Just mess around and play one or two notes; see if anything just naturally sounds good.
3. Decide what kind of mood you want to create with this beat (happy, sad, etc.) and think about what kind of scale (Major/minor) would help you create that mood. You can use the website looknohands.com to help you figure out the notes of a certain scale, and then you can just pick a few notes from that scale to work with. Ask the instructor to help you with this.

When you’ve got a good loop recorded, copy everything so that all parts end on Bar 17. Here’s the easy way to do it:
1. In the Sequencer, find an empty spot below and to the right of all the regions in your beat. Click and drag the mouse upwards and to the left so that you see a box around everything in your beat. Let go of the mouse button. 2. With everything in the beat still highlighted, hold down the OPTION/ALT key on your keyboard. Click on one of the regions and drag it to the right. Make sure that the new regions start exactly where the original regions end.
3. Now repeat Step 1-2, grabbing all the new stuff along with the original parts. Keep doing this until the beat goes all the way to Bar 17.
4. Save the beat as: your name_FullSong1
5. Listen back to the whole Verse and see if it sounds good. If you get bored listening to a whole verse section, try to think of what you can add or subtract to keep things flowing.
6. Have the instructor listen to your Verse.
7. Save again!!!

(Instructor: if the student’s work meets all criteria, have her/him move on to Week 11, Lesson 2)

Resources:
1. www.looknohands.com - scale finder
2. www.youtube.com - online videos
3. www.grooveshark.com - music library

Basic Keyboarding (pt. 6)


Discussion:
(Instructor: distribute C Minor worksheets before starting lesson.)

Last time we discussed the Minor Scale and used the formula (W-H-W-W-H-W-W) to figure out the notes of the C Minor scale. What is the general mood or feeling of the Minor Scale? How is it different from the Major scale?

Today, using your worksheet from last time, you are going to make a beat in the key of C Minor. Ready? Let’s do it…

Please do the following:
1. Open Reason and create a new file.
2. Create a Redrum and load some sounds into it (bass, snare/clap, hi hat, percussion, etc.)
3. Make a 32-step drum beat.
4. Set your L marker to Bar 1 and your R marker to Bar 17.
5. Use Copy Pattern to Track to put the beat into the Sequencer.6. Now, click on Pattern 2 and make a 2nd drum beat (16-step is fine).
7. Move your L marker to Bar 17 and your R marker to Bar 25.
8. Use Copy Pattern to Track to put the beat into the Sequencer. 9. Now Create a SubTractor Analog Synthesizer.
10. Click on the Browse Patch button
11. Browse through the different folders until you find a sound that you like. Double-click on it to load it into the Subtractor.
12. In the Sequencer, move the L marker back to Bar 1 and the R marker back to Bar 5 and hit Play to listen to your beat play back.13. Look at your worksheet and see what notes are in the C Minor scale.
14. Using only the keys of the C Minor Scale, come up with a melody to go with the beat...
  • The first note you play has to be C!
  • The other notes should all be from C Minor, but you can play them in any order you want.
15. When you've got an idea for a melody down, Record it. 16. Use OPTION-drag to Copy out your melody so that it ends on Bar 25. 17. Now move your markers so that the L is on Bar 17 and the R is on Bar 25.
18. Create a 2nd Subtractor and load a different sound into it. (Try to pick a sound from a different folder than your first sound.)
19. Again, using only keys from C Minor, come up with a second melody to go over the first one during the hook.
20. When you're done, move the L marker back to Bar 1 and play the whole thing back from the start. Sound good? If not, what can you change to make it better?
21. Add any other instruments that you like.
22. Save this as: your name_CMinorBeat
23. Have the instructor listen to your work.

(Instructor: Advanced students can be encouraged to either add more instruments to their beat, or make a new beat using a different Minor scale. Students can use either their worksheets and the formula, or the looknohands.com website to figure out the notes of the scale.)

Resources
www.looknohands.com - website for figuring out scales
Here’s how to use the looknohands website to listen to the A Minor scale:
1. Click on the link to go to http://www.looknohands.com/chordhouse/piano/
2. In the Scales column, click on a key (eg. A)
3. In the list of REGULAR SCALES, click on Melodic Minor (Descending).
4. Note the keys of the scale are now shown up in the keyboard diagram.
5. Click on the Play button to hear the scale.
6. When you've heard enough, click the Stop button.

Basic Keyboarding (pt. 5)


Materials:
C Minor worksheet
• Pencils/pens
• Computer with internet connection and speakers.
• Examples of popular music using Major and Minor scales.

Discussion:
Last week we spent some time focusing on the Major Scale and getting to know the sound of it. Today we're going to spend some time working with another popular scale, the Minor Scale...

So, we already know the general feeling that the Major Scale creates (happy, upbeat, etc.). In contrast, how would we describe the Minor Scale?

(Instructor: Demonstrate playing a Minor scale (e.g A minor). If needed, refer to resource at bottom of the lesson for help.)

So what's the general feeling or vibe?

Now let’s listen to a few examples of songs that are built around Minor Scales:

(Instructor: Play short selections of variety of Minor key songs. Suggestions: - "Beautiful" by Akon - key of C Minor - Beethoven’s 5th Symphony – key of C Minor - "Glamorous Lifestyle" by The Jacka ft. Andre Nickatina (produced by Traxamillion) - key of B flat Minor - “Boulevard of Broken Dreams” by Green Day – key of F sharp Minor)

How would you describe the emotions of each of these songs? Very different, right?
As you can hear, the Minor scale can actually be used to convey a lot of different feelings. You might say that something that they all have in common is passion, or a strong emotion, whether it is loneliness, longing, or a taste for living a "glamorous lifestyle",

Like with the Major scale, the Minor Scale has a certain formula that it is built around. The

Minor Scale formula is:
W - H - W - W - H - W - W

Using this formula, let's quickly figure out the keys of the C Minor scale on the picture below...

So, for today's assignment, you are going to be using C Minor. There are three parts to this assignment....

Part 1
1. Get a C Minor worksheet from the instructor.
2. Using the Minor scale formula (W-H-W-W-H-W-W), find and label the keys of the C Minor scale.
3. Have the instructor check your work before moving on to Part 2.

Part 2
1. Start a new Reason session.
2. Make sure you see a Mixer 14:2 at the top of your rack.
3. Set the Tempo to 80 BPM.

4. Create a SubTractor Analog Synthesizer.
5. Click on the Browse Patch button in the upper left corner of the Subtractor. 6. In the Patch Browser, go to Reason Factory Soundbank>Subtractor Patches
7. In the Subtractor folder, go into the folder called Polysynths and find a sound that you like.
8. Make sure the L marker is on Bar 1 and the R marker is on Bar 5. (You may need to zoom in on the Sequencer to see the right numbers.
9. Make sure that both the Click and the Loop buttons are lit.

10. Hit Play and listen to the tempo of the click. Adjust it if you need to.
11. Practice playing the C Minor scale up and down in time with the click - each note should be played on the click. If you need to, feel free to slow the tempo down. Look at your worksheet if you can’t remember the keys.
12. When you are ready, hit Record and record yourself playing the scale up and back. Don't forget to wait to start playing at Bar 1!
13. Hit Stop when you are finished.If you don't like your performance, delete it and do it over. Keep working until you get it right!
14. Save this as: your name_CMinorScale.
15. Have the instructor check your work before moving on to the next lesson.
(Instructor: Collect C Minor worksheets for use in the following lesson)


Resources
www.looknohands.com - website for figuring out scales
Here’s how to use the looknohands website to listen to the A Minor scale:

1. Click on the link to go to http://www.looknohands.com/chordhouse/piano/
2. In the Scales column, click on a key (eg. A)
3. In the list of REGULAR SCALES, click on Melodic Minor (Descending).
4. Note the keys of the scale are now shown up in the keyboard diagram.
5. Click on the Play button to hear the scale.
6. When you've heard enough, click the Stop button.